
Please visit Part 2 – Design & sckeleton
The connection pin scheme for Arduino is:
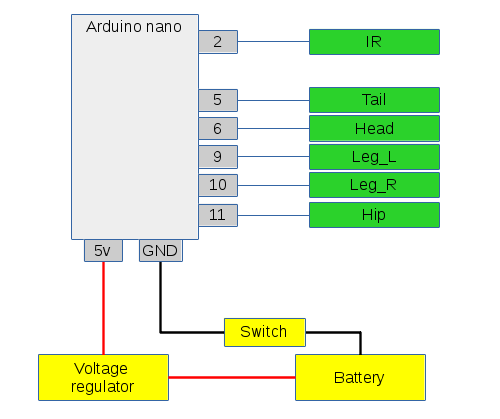
- Left leg servo (9 pin)
- Right leg servo (10 pin)
- Hip servo (11 pin)
- Head servo (6 pin)
- Tail servo (5 pin)
- Receiver IR (2 pin)
- Testing led (13 pin)
- 5 volts to (balanced voltage from voltage regulator and servos 5volts)
Batteries
Choosing the correct battery is important, because moving 5 servos has a real power consumption. Servos are motors and motors consume a lot of energy.
The problem is that when a system requires more energy than the battery can serve (Amperage of discharging) the voltage drops belong 5 volts that requires Arduino (specs) and Ardunio resets itself. So, it is needed to maintain 5 volts constantly.
Our options
- A small lithium battery (1S 3.7v) : We can convert it to 5volts but the energy the battery can provide is low, so it is not enough
- A 9volts alkaline battery + voltage regulator : It works fine and it fits inside the body of the toy. However, when the power is over, it is necessary to extract the entire battery to replace it.
- A 2S battery (2000mAh) + voltage regulator: It works fine but is too big. However you can leave the charger cable outside the body of the robot to charge it.
Continues in Part 4 – Brain & Code